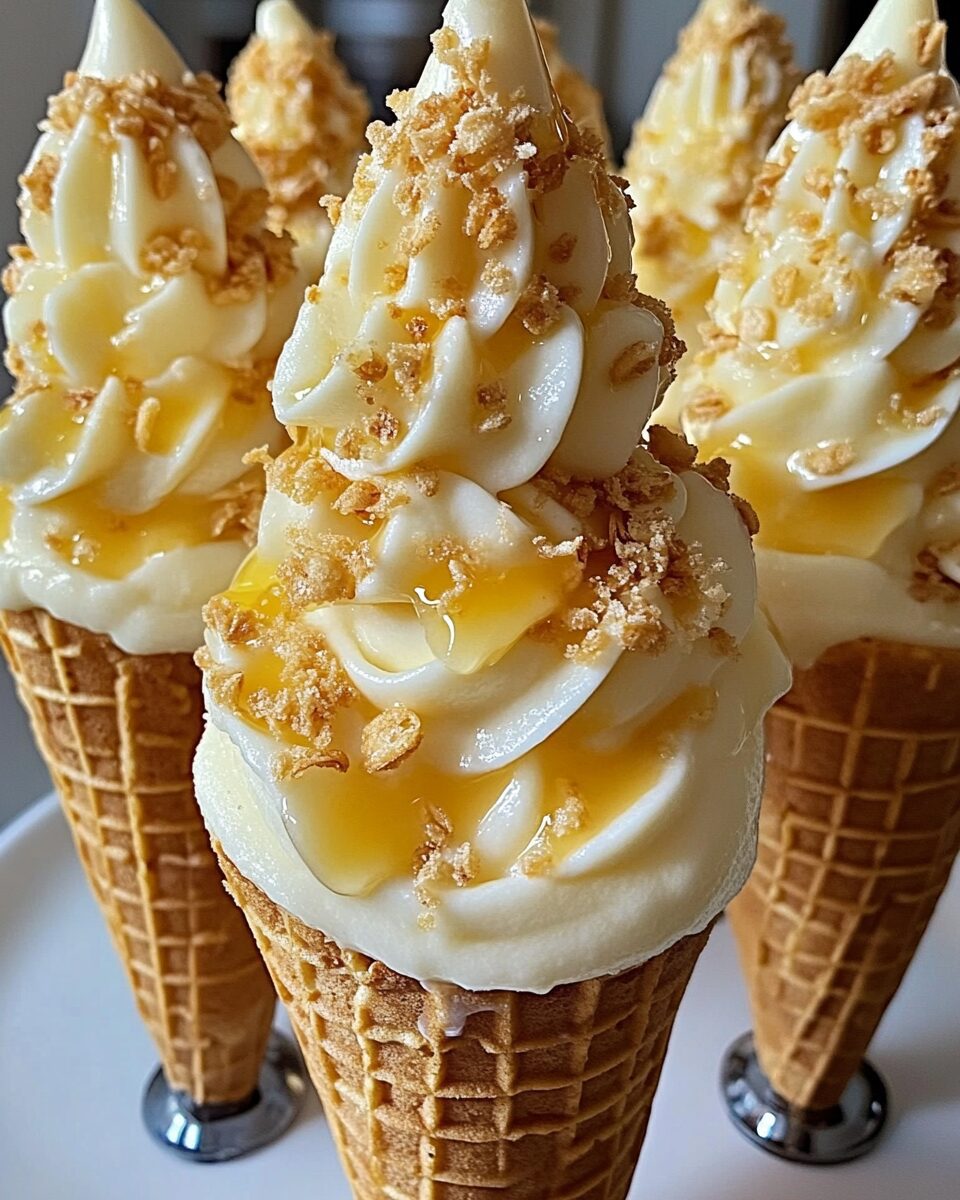
Banana Pudding Cheesecake Cones
Banana Pudding Cheesecake Cones are an innovative twist on two classic desserts that combine the creamy, rich flavors of cheesecake with the nostalgic sweetness of banana pudding, all served in a fun and easy-to-eat cone. This recipe is perfect for gatherings, parties, or just a fun treat to enjoy at home. The cones are filled with a luscious cheesecake filling, layered with ripe bananas, and topped with a fluffy whipped cream, creating a delightful balance of textures and flavors. The presentation is as appealing as the taste; these cones are not just desserts but also a feast for the eyes, making them a perfect centerpiece for any dessert table. Each bite transports you to dessert paradise, where the flavors meld seamlessly, and the textures create a delightful experience. Whether for a summer picnic, a birthday celebration, or simply to satisfy a sweet tooth, Banana Pudding Cheesecake Cones are sure to impress and satisfy everyone who tries them.
Why You’ll Love This Recipe?
This Banana Pudding Cheesecake Cone recipe is a standout dessert for several reasons. First, the flavor combination is simply irresistible. The creamy cheesecake filling pairs beautifully with the sweet and slightly tart bananas, while the cone adds a satisfying crunch that enhances the overall experience. Second, preparation is a breeze. Unlike traditional cheesecakes that require baking and cooling time, these cones come together quickly, allowing you to whip them up in under an hour. This makes them an ideal choice for last-minute gatherings or spontaneous cravings. Finally, the visual appeal of these cones cannot be overstated. Each cone is a work of art, with layers of creamy filling, bananas, and whipped topping, garnished with additional banana slices or a sprinkle of crushed cookies. They are not only delicious but also perfect for Instagram-worthy moments, making them a hit at any event.
Ingredients:
To create these delectable Banana Pudding Cheesecake Cones, gather the following ingredients:
- 8 ounces cream cheese, softened – The base for your cheesecake filling, providing a rich and creamy texture that is essential for the dessert.
- 1 cup powdered sugar – This will sweeten the filling without adding any graininess, ensuring a smooth and creamy consistency.
- 1 teaspoon vanilla extract – Adds depth to the cheesecake flavor, balancing the sweetness with a hint of warmth.
- 1 cup heavy whipping cream – Whipped to soft peaks, it lends a lightness to the filling, making it airy and delightful.
- 2-3 ripe bananas, sliced – The star ingredient that brings the classic banana pudding flavor, contributing natural sweetness and texture.
- 1 package (3.4 ounces) instant vanilla pudding mix – This adds a rich flavor and creamy texture, mimicking traditional banana pudding.
- 2 cups milk – Used to prepare the instant pudding and adds creaminess to the filling.
- 12-15 sugar cones – These serve as the vessel for your dessert, providing a crunchy contrast to the creamy filling.
- Additional banana slices and crushed vanilla wafers for garnish – These toppings enhance the flavor and provide visual appeal.
Each ingredient plays a vital role in achieving the perfect Banana Pudding Cheesecake Cone. The cream cheese and heavy cream create a rich base, while the bananas and vanilla pudding blend harmoniously to evoke the classic banana pudding flavor. The sugar cones not only hold the filling but also add a delightful crunch that complements the creamy texture.
How To Make Banana Pudding Cheesecake Cones?

Creating Banana Pudding Cheesecake Cones is a straightforward process that results in a delicious dessert. Follow these detailed steps to make your cones:
- Start by preparing the filling. In a large mixing bowl, beat the softened cream cheese with an electric mixer until smooth and creamy, ensuring there are no lumps.
- Gradually add the powdered sugar, mixing until fully incorporated. Scrape down the sides of the bowl as needed to ensure even mixing.
- Add the vanilla extract and mix again until well combined. The mixture should be smooth and creamy, with no visible lumps.
- In a separate bowl, whip the heavy cream until soft peaks form. This will take a few minutes using an electric mixer on medium speed. Be careful not to over-whip.
- Gently fold the whipped cream into the cream cheese mixture. Use a spatula to combine, being careful not to deflate the whipped cream. The goal is to maintain the light and airy texture.
- In another bowl, prepare the instant vanilla pudding mix according to the package instructions, using the milk. Whisk until it reaches a smooth consistency.
- Once the pudding is ready, fold it into the cream cheese and whipped cream mixture until fully combined. This will create a luscious and creamy filling.
- Next, prepare the cones. Take your sugar cones and place them upright in a sturdy holder or a muffin tin to keep them steady while filling.
- Using a piping bag or a spoon, fill each cone with the cheesecake mixture, pressing down gently to ensure there are no air pockets. Fill them to just below the rim to allow space for the bananas and whipped topping.
- Once the cones are filled, layer in the banana slices on top of the cheesecake filling. You can arrange them in a spiral or simply place them on top.
- Finally, add a generous dollop of whipped cream on top of the bananas, creating a beautiful presentation. For added flair, sprinkle crushed vanilla wafers over the whipped cream and add a few extra banana slices as a garnish.
- Repeat the process for the remaining cones until all the filling is used. Serve immediately or refrigerate them for up to an hour before serving to allow the flavors to meld.
These steps will guide you in creating the perfect Banana Pudding Cheesecake Cones that are sure to impress your guests or satisfy your sweet cravings. Enjoy the creamy, rich flavors and the fun of eating dessert from a cone!
Tips For Variations:
While the classic Banana Pudding Cheesecake Cones are delicious on their own, there are numerous ways to customize and elevate the recipe to suit different tastes and occasions. Here are some creative variations to consider:
- Flavor Infusions: Incorporate different flavors into the cheesecake filling by adding extracts or flavored syrups. Almond extract can add a unique twist, while chocolate syrup can create a chocolate banana cheesecake cone.
- Fruit Options: Feel free to experiment with other fruits alongside or instead of bananas. Strawberries, blueberries, or even diced peaches can provide a refreshing contrast to the creamy filling and add vibrant colors.
- Nutty Crunch: For added texture, consider mixing crushed nuts, such as pecans or walnuts, into the filling or sprinkling them on top of the whipped cream. This will add a delightful crunch and enhance the overall flavor profile.
- Cookie Crust: Instead of using sugar cones, try making a cookie crust for a different texture. Crush vanilla wafers or graham crackers and mix them with melted butter to create a crumb crust at the bottom of each cone.
- Chocolate Dipped Cones: For an indulgent treat, dip the tops of the sugar cones in melted chocolate and sprinkle with crushed nuts or sprinkles before filling them. This extra layer of chocolate will elevate the dessert and add a delightful surprise.
- Frozen Treat: Turn these cones into a frozen treat by freezing the filled cones for a few hours. This will create a creamy banana pudding cheesecake ice cream cone that is perfect for hot summer days.
These variations allow you to customize your Banana Pudding Cheesecake Cones to suit your palate, making this recipe versatile and fun to explore. Whether you stick to the classic or experiment with new flavors and textures, your dessert will be a hit!
Serving Suggestions:
Serving Banana Pudding Cheesecake Cones can be as fun and creative as making them. Here are some recommendations to make your presentation stand out:
- Decorative Stands: Use tiered cake stands or decorative trays to display the cones at parties or gatherings. This not only makes for an appealing presentation but also allows guests to easily grab their cones.
- Personalized Touches: For a special occasion, consider adding personalized labels or tags to each cone. You can write guests’ names or a fun dessert-themed message to add a special touch.
- Pairing with Beverages: Serve the cones alongside a selection of beverages. Iced tea, lemonade, or even a creamy banana smoothie can complement the dessert beautifully and create a cohesive theme.
- Interactive Dessert Station: Set up a DIY dessert station where guests can assemble their cones. Provide all the fillings, toppings, and cones, allowing everyone to create their unique combinations.
- Themed Parties: For themed gatherings, incorporate elements that match the theme. For example, for a tropical party, use colorful umbrellas or tropical-themed decorations to enhance the festive atmosphere.
- Seasonal Variations: Adjust your serving suggestions based on the season. In summer, serve with fresh berries, while in fall, consider garnishing with caramel drizzle or a sprinkle of cinnamon for a cozy touch.
These serving suggestions will help you present your Banana Pudding Cheesecake Cones in a way that enhances their appeal and creates a memorable dessert experience for you and your guests. Enjoy the creativity and fun that comes with sharing these delightful treats!
FAQ:
Can I make the filling ahead of time?
Yes, you can prepare the cheesecake filling a day in advance. Just store it in an airtight container in the refrigerator. Fill the cones shortly before serving to keep the cones crunchy.
How do I store leftover cones?
If you have leftover cones, store them in the refrigerator without the whipped cream topping. The cones can become soggy, so consider adding the whipped cream just before serving.
Can I use a different type of cone?
Absolutely! While sugar cones work well, you can also use waffle cones or even homemade cones for a unique twist. Each type of cone will bring its own flavor and texture to the dessert.
What can I substitute for heavy cream?
If you need a substitute for heavy cream, consider using whipped topping or a dairy-free alternative like coconut cream. However, the texture and flavor may vary slightly from the original recipe.
How can I make these cones more visually appealing?
Enhance the visual appeal by adding colorful sprinkles, chocolate shavings, or fresh fruit on top of the whipped cream. Using decorative cones can also elevate the look of your dessert.

Banana Pudding Cheesecake Cones
Equipment
- Mixing Bowl
- Electric Mixer
- Piping Bag
- Muffin Tin
Ingredients
Ingredients
- 8 ounces Cream Cheese, softened Base for the cheesecake filling, providing a rich and creamy texture.
- 1 cup Powdered Sugar Sweetens the filling without adding graininess.
- 1 teaspoon Vanilla Extract Adds depth to the cheesecake flavor.
- 1 cup Heavy Whipping Cream Whipped to soft peaks for lightness in the filling.
- 2-3 pieces Ripe Bananas, sliced Brings the classic banana pudding flavor.
- 1 package (3.4 ounces) Instant Vanilla Pudding Mix Adds rich flavor and creamy texture.
- 2 cups Milk Used to prepare the instant pudding.
- 12-15 pieces Sugar Cones Serves as the vessel for the dessert.
- Additional Banana Slices For garnish.
- Crushed Vanilla Wafers For garnish.
Instructions
- In a large mixing bowl, beat the softened cream cheese with an electric mixer until smooth and creamy.
- Gradually add the powdered sugar, mixing until fully incorporated.
- Add the vanilla extract and mix until well combined.
- In a separate bowl, whip the heavy cream until soft peaks form.
- Gently fold the whipped cream into the cream cheese mixture.
- Prepare the instant vanilla pudding mix according to package instructions using the milk.
- Fold the pudding into the cream cheese and whipped cream mixture until fully combined.
- Place sugar cones upright in a muffin tin to keep them steady.
- Fill each cone with the cheesecake mixture using a piping bag or spoon.
- Layer banana slices on top of the cheesecake filling.
- Add a dollop of whipped cream on top and garnish with crushed vanilla wafers and banana slices.
- Serve immediately or refrigerate for up to an hour before serving.